Preprocessors
Overview
This chapter explains preprocessors: how to use them, set their parameters, load and save them.
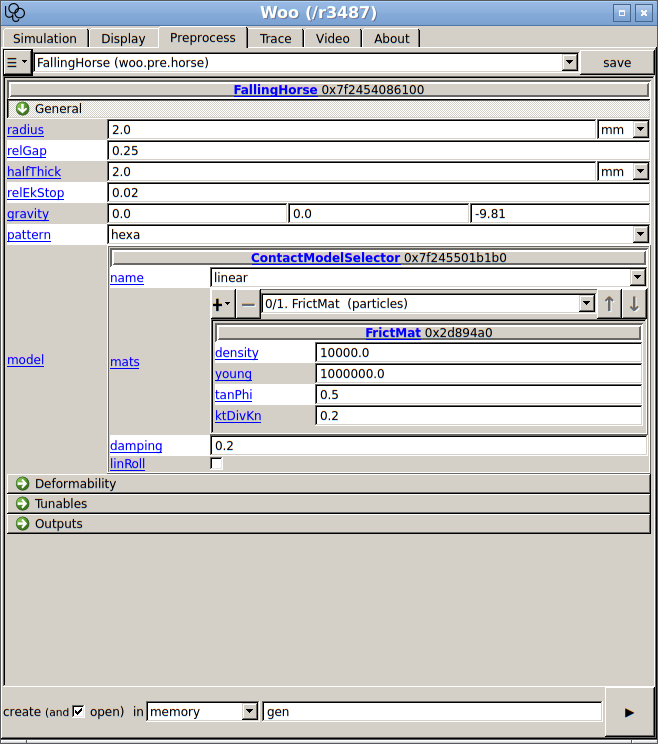
In the Basics chapter, it was explained how to write a simple simulation in a script. There is an easier way to create parametrized pre-defined simulation: preprocessors. All classes deriving from woo.core.Preprocessor are presented in the Preprocess tab in the controller:

Fig. 4 Preprocessor of the falling horse selected in the controller.
When the ▶ is clicked, a new scene object is created and assigned to woo.master.scene; each preprocessor has different parameters which are used when constructing the scene. What is happening behind the scenes with ▶? When the preprocessor is called (using () on the instance), it returns the constructed scene.
This can be done in the command line as well:
# create the instance with default parameters
Woo[1]: horse1=woo.pre.horse.FallingHorse()

# create instance and set parameters in the constructor
Woo[2]: horse2=woo.pre.horse.FallingHorse(gravity=(0,0,-20))

Woo[3]: horse1.gravity, horse2.gravity
Out[3]: (Vector3(0,0,-9.81), Vector3(0,0,-20))

# calling the preprocessor returns a Scene object
Woo[4]: horse2()
Out[4]: <Scene @ 0x189c610>

# set the current scene by assigning to woo.master.scene
Woo[5]: woo.master.scene=horse2()

# let's see what's inside
Woo[6]: S=woo.master.scene    # avoid lot of typing

# the FallingHorse.gravity parameter was passed to DemField.gravity
Woo[7]: S.dem.gravity
Out[7]: Vector3(0,0,-20)
Preprocessors can be, just like any other objects, dumped to file, and reloaded. Clicking the save pops up a dialogue; file format is chosen by extension (see Formats). A preprocessor can be loaded by using .
The same can be done from a script or the command line:
Woo[8]: horse=woo.pre.horse.FallingHorse(gravity=(0,0,-20))

# dump to file
Woo[9]: horse.dump('horse.preprocessor',format='expr')

# load again: class must be given (for checking what is being loaded)
# we can also use woo.core.Object
Woo[10]: woo.core.Object.load('horse.preprocessor')
Out[10]: <FallingHorse @ 140438205189872 (py)>

# dump to string, just to see
Woo[11]: print(horse.dumps(format='expr'))
##woo-expression##
#: import woo.pre.horse
woo.pre.horse.FallingHorse(
	title='',
	radius=0.002,
	relGap=0.25,
	halfThick=0.002,
	relEkStop=0.02,
	gravity=(0, 0, -20),
	dir=(0, 0, 1),
	pattern='hexa',
	model=woo.models.ContactModelSelector(
		name='Schwarz',
		numMat=(1, 2),
		matDesc=['particles', 'mesh'],
		mats=[
			woo.dem.HertzMat(density=10000, id=-1, young=1e+06, tanPhi=0.5, ktDivKn=0.2, surfEnergy=0.4, alpha=0.6)
		],
		distFactor=1,
		poisson=0.2,
		restitution=0.7,
		alpha=0,
		surfEnergy=0
	),
	deformable=False,
	stand=False,
	meshDamping=0.03,
	dtSafety=0.3,
	reportFmt='/tmp/{tid}.xhtml',
	vtkStep=40,
	vtkFlowStep=40,
	vtkPrefix='/tmp/{tid}-',
	grid=False
)
Saved preprocessors (and scenes) can be given as argument in the shell (instead of a script); the preprocessor will be run and assigned to woo.master.scene, and the simulation starts right away:
$ woo horse.preprocessor
Welcome to Woo /r3487
Using preprocessor horse.preprocessor
[[ ^L clears screen, ^U kills line. F12 controller, F11 3d view, F10 both, F9 generator, F8 plot. ]]
If you don’t want to run the simulation automatically, say:
woo --paused horse.preprocessor
Simple expressions can be used this way, too; this is mostly useful for debugging:
woo -e 'woo.pre.horse.FallingHorse(gravity=(0,0,-20))'
Tip
Report issues or inclarities to github.